

How To Create Ssl Certificate In Redhat
In today's guide, we will discuss how to generate a self-signed SSL certificate on Linux as well as how to implement them in Apache. SSL is becoming more and more important as the internet becomes more popular. With free Let's Encrypt certificates becoming a commodity that anyone can use, there's no reason for anyone to not use SSL – not to mention the search ranking benefits, and the fact that browsers and search engines will trust your site.
However, you can also generate your own self-signed SSL certificate for private use on your server. One big reason to do this is encryption. While your personal certificate won't mean anything to browsers, and visitors will still get a warning message if they visit your site directly, you can at least be sure that you're protected against "man-in-the-middle" attacks. A self-signed certificate is a good first step when you're just testing things out on your server, and perhaps don't even have a domain name yet.
Let's start with our step by step procedure on how to create a self-signed SSL certificate on Linux.
Step 1: Create an RSA Keypair
The first step in generating your own self-signed SSL certificate is to use the "openssl" package on Linux/CentOS to create an RSA key pair. To do this, make sure that you have the package installed. If not, install it with this command:
sudo yum install openssl
Chances are that you already have it available on your system – it should now be installed regardless. Once the package is confirmed to be installed on your system, generate the keypair using the following command:
openssl genrsa -des3 -passout pass:x -out keypair.key 2048
This command uses 2048 bit encryption and outputs a file called keypair.key, as shown here:
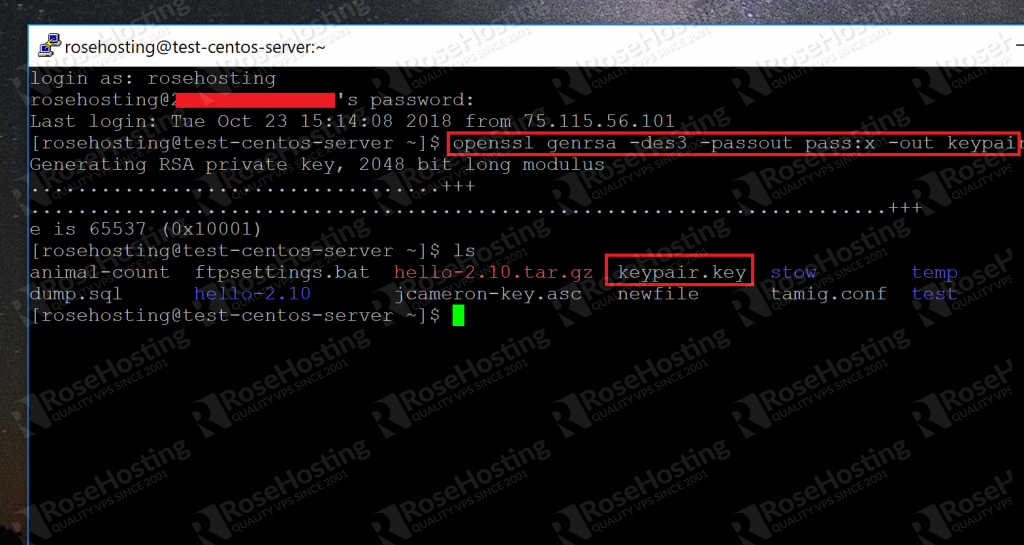
As you can see, the key has been generated and placed in the current directory.
The /etc/httpd folder is where the operating system keeps all important SSL related items. First, let's create a new folder to hold all of our files related to our private key:
sudo mkdir /etc/httpd/httpscertificate
We called the folder httpscertificate and will refer to it by that name for all of the other command line examples. You can name the folder anything you want.
To extract the private key from the keypair file that we just created, type in the following:
openssl rsa -passin pass:x -in keypair.key -out /etc/httpd/httpscertificate/012.345.678.90.key
Replace the section in bold with the IP address of your own server. Or if you're able to access your site with a domain name, you can use that as well.
This will create a .key file in the folder that we just created. When this process is done, we can delete the original keypair file:
rm keypair.key
Step 3: Creating a "Certificate Signing Request" (CSR) File
With the key, we can create a special .csr file that we can either sign ourselves or submit to a "Certificate Authority". It's in a standardized format, and can be easily generated with our key from the previous step. To create it, type the following command:
openssl req -new -key /etc/httpd/httpscertificate/012.345.678.90.key -out /etc/httpd/httpscertificate/012.345.678.90.csr
Again, replace the items in bold with the IP address or domain name that you settled on in step 2. When you run this command, the tool will ask you for some of your personal information, such as your location and organization name:
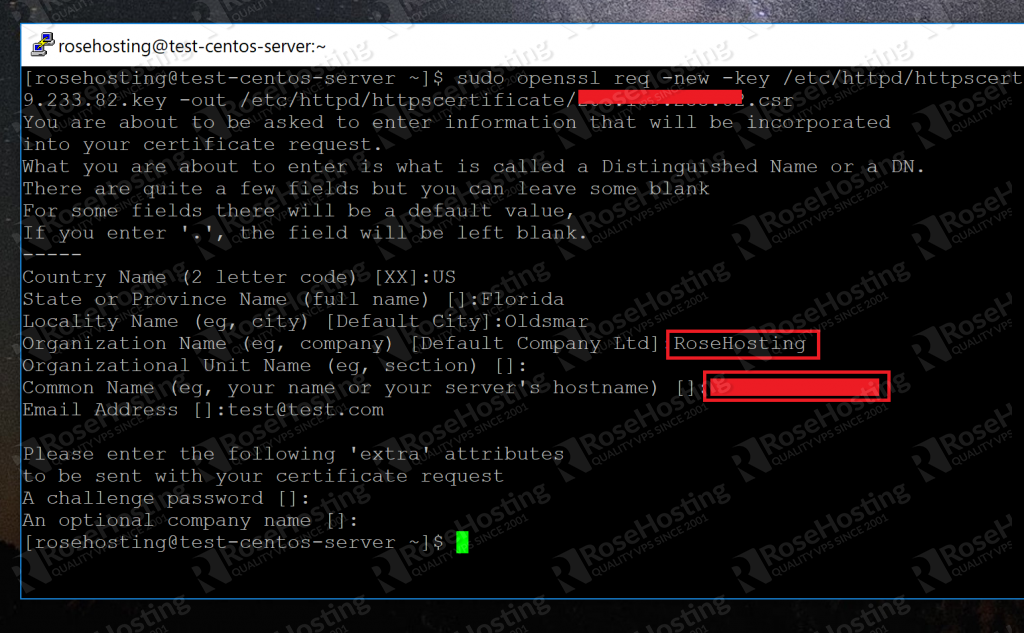
A CA (short for Certificate Authority) can use these details to verify that you are indeed who you say you are. Try to populate the fields with as much information as you can.
Once you've finished entering these details, the tool will finish with its work and place a .csr file in the directory that we created for just this purpose.
Step 4: Creating the Certificate ".crt" File
With the CSR, we can create the final certificate file as follows. We will now use our .csr and .key files to create our .crt file:
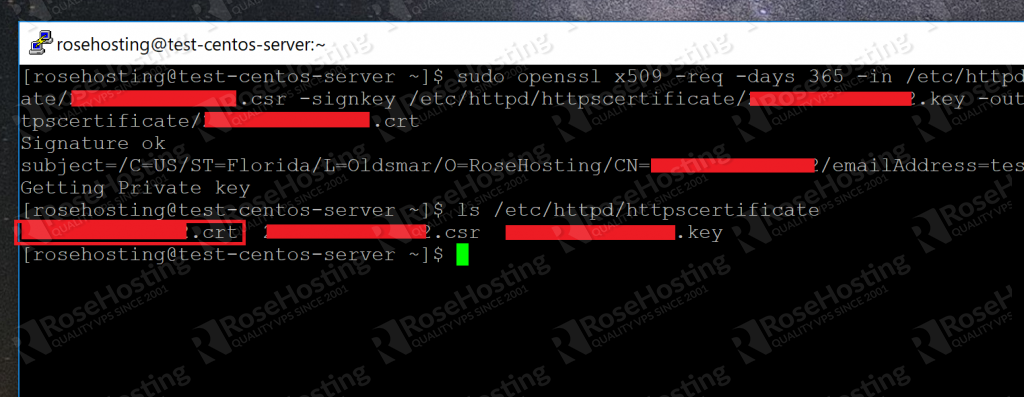
openssl x509 -req -days 365 -in /etc/httpd/httpscertificate/012.345.678.90.csr -signkey /etc/httpd/httpscertificate/012.345.678.90.key -out /etc/httpd/httpscertificate/012.345.678.90.crt
This creates a .crt file in the location with all of our other files. We now know how to generate our self-signed SSL certificate. Here's a screenshot of the final files in our security folder:
Now we need to tell Apache where these files are.
Step 5: Configuring Apache to Use the Files
All that we need to do now is show Apache where our generated self-signed certificates are. First, we need to install the mod_ssl package with the command:
sudo yum install mod_ssl
Once done, this will place a ssl.conf file inside the /etc/httpd/conf.d/ folder. We need to modify this default file. Use your preferred text editor:
sudo vi /etc/httpd/conf.d/ssl.conf
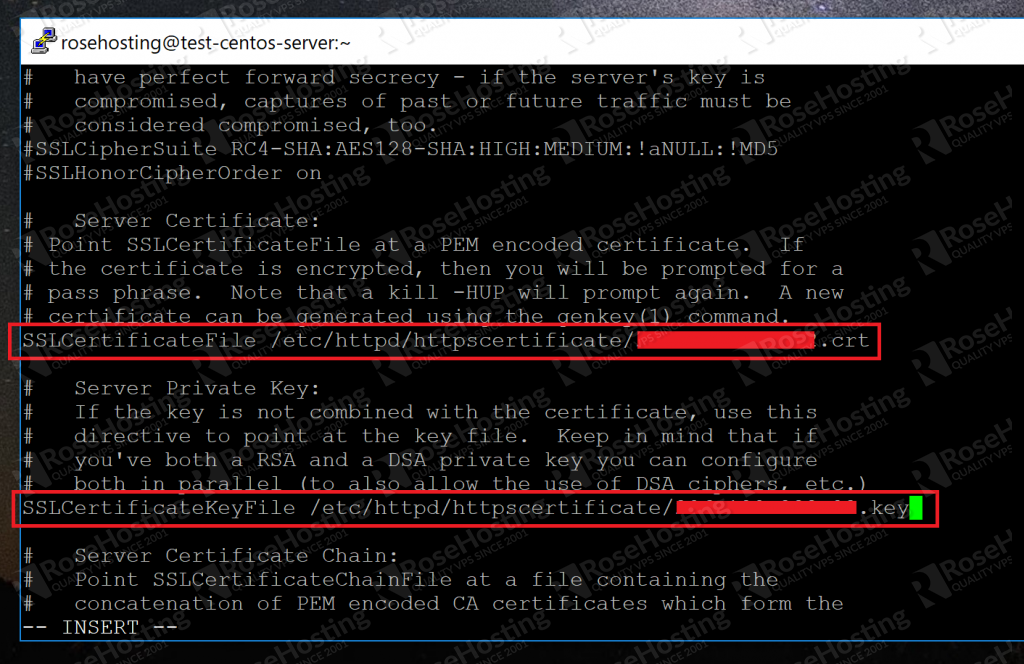
Now scroll down till you find the lines starting with:
SSLCertificateFile SSL CertificateKeyFile
Change the default paths with the paths to the certificate file and key file respectively, as shown here:
Save your changes. Now just restart Apache with:
sudo apachectl restart
And you're done! When Apache restarts, it will be configured to allow SSL connections by using the generated self-signed SSL certificates.
When you connect to your IP address via HTTPS the next time, you'll be warned that it's not a trusted certificate:
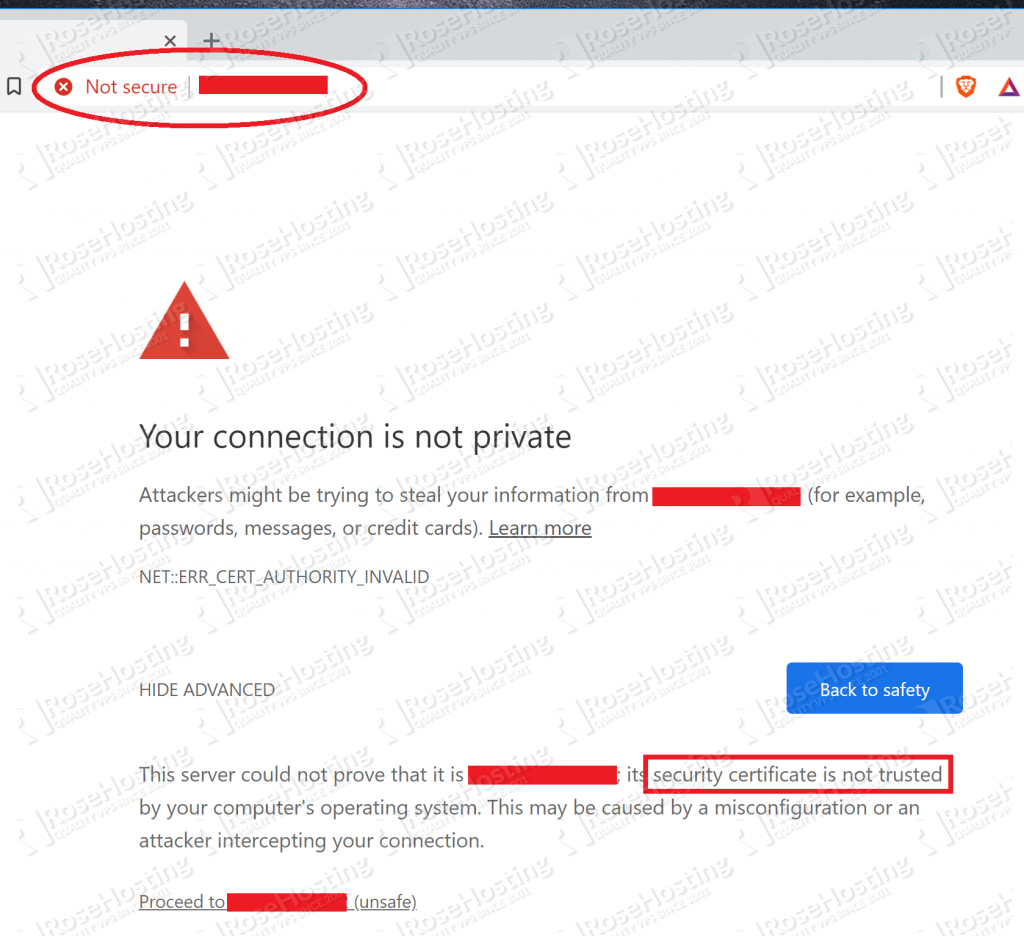
That's ok. We know this since we signed it ourselves! Just proceed and it'll take you to the actual website:
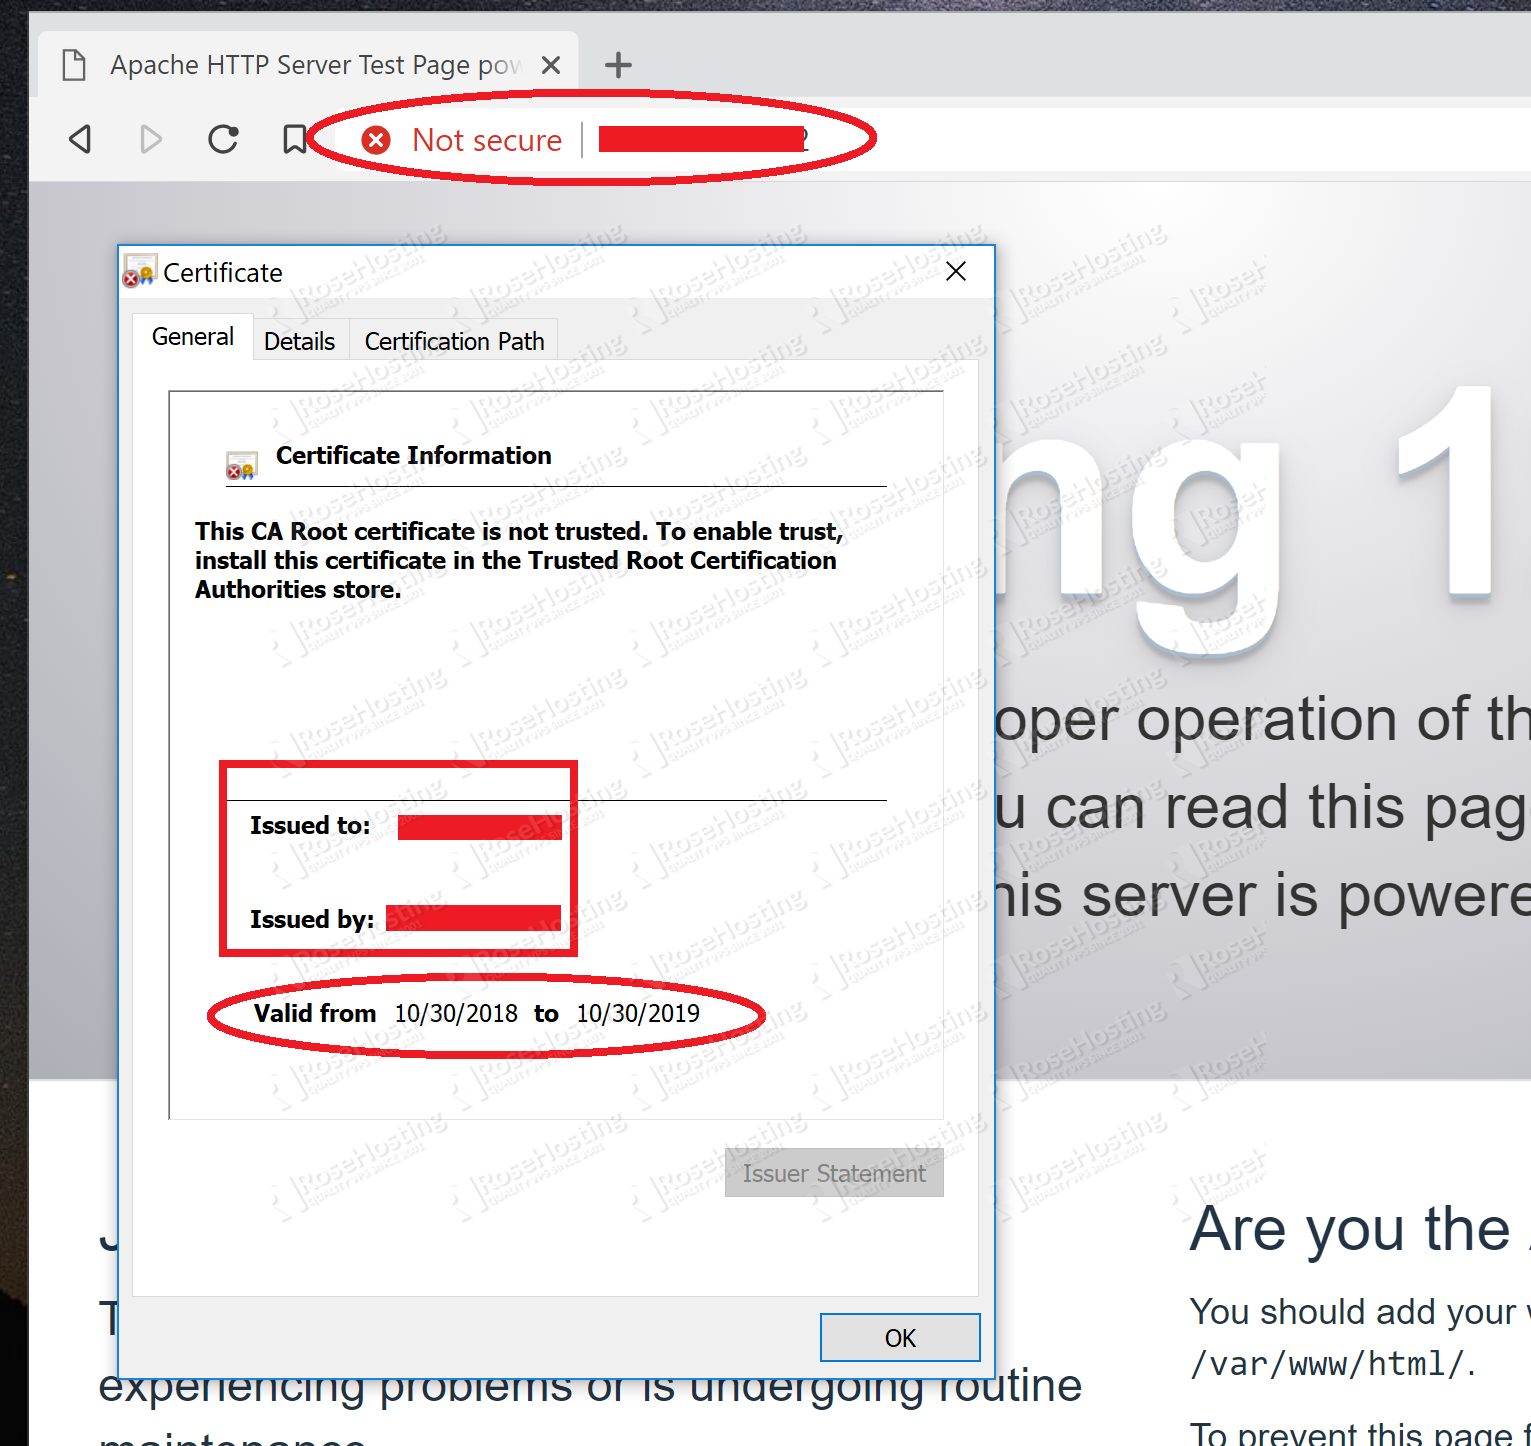
Here you can see that it's using the certificate that we created. It's not much use for anyone else visiting your site since they can't verify your identity. But you know it's safe, and moreover that it's encrypted. No man in the middle attacks!
You now know how to generate your own self-signed SSL certificates and implement them on your Apache web server.
If you are one of our Managed VPS hosting clients, we can do all of this for you at no extra cost. Simply contact our system administrators and they will respond to your request as soon as possible.
If you liked this blog post on how to create a self-signed SSL certificate on Linux, please share it with your friends on social media networks, or if you have any question regarding this blog post, simply leave a comment below and we will answer it. Thanks!
How To Create Ssl Certificate In Redhat
Source: https://www.rosehosting.com/blog/how-to-generate-a-self-signed-ssl-certificate-on-linux/
Posted by: henleymoures.blogspot.com
0 Response to "How To Create Ssl Certificate In Redhat"
Post a Comment